This weekend was extremely productive, unlike the last few where we were either sleepy, hungover, traveling, or just plain bored with fixing the place. Our house-energy has a definite ebb and flow, and right now it’s at a high point. We’re taking advantage of it while it lasts.
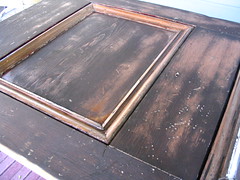
For starters, I finally refinished our second front door. The first was done about two years ago, and since that time they’ve been wearing me down with their annoying unmatchiness. I started the project two weeks ago, but of course it was more time consuming than I had planned on. And, we made one BIG mistake; we tried to rush it. Which resulted in really crappy results:
Generally, the steps I take to refinish a door like this are:
- Heat gun to remove the paint
- Paint stripper to get the leftover bits of paint off
- Orbital sander to smooth out the finish
- Wood conditioner
- Stain, multiple coats (this door has 2)
- Varnish, multiple coats (again, this door has 2)
The above photo illustrates beautifully what happens when you get lazy with the sanding. Even though the door appeared to be clean, I didn’t get all of the original shellac finish off so the stain didn’t soak in evenly. It looked truly awful. Sooooo, we ended up taking an extra day to resand and restain. The skimping on sanding did NOT save time. Exactly the opposite. So learn from my mistakes, people!
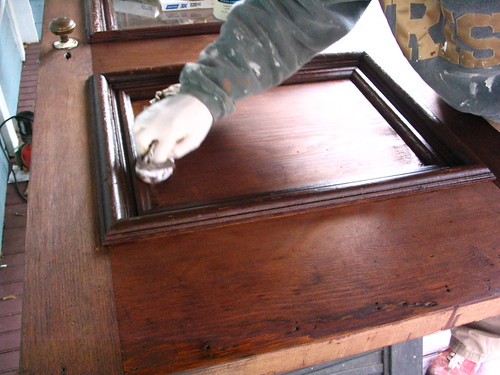
Here’s the door at that same point in the process, with better sanding:
Major difference, right?
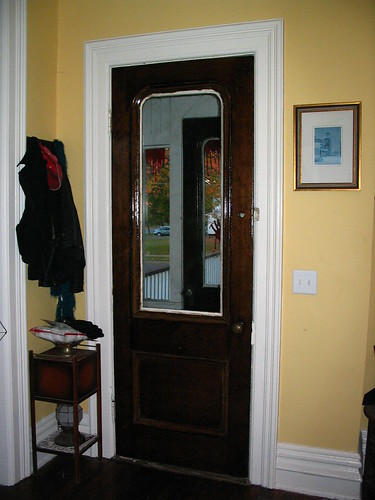
The door looks great now, and it’s officially done. One more thing off the giant to-do list. Yeehaw. Here’s a photo of it all shiny with wet varnish, and in need of some paint to make the glazing compound blend in – it’s not perfect yet, but you get the idea:

In that photo you can see how the two doors are set up. We basically have one front door, the tiniest little mudroom ever, then another door. I have a feeling at one time they might have been together as a pair. But where? I have no idea.
In other news, Teague put baseboard molding up in the kitchen. This is one of the last few kitchen tasks we’ve left hanging for over a year… we couldn’t decide on how best to match the existing baseboard found elsewhere in the house, which is actually 3 seperate pieces. It was partly a budget issue, partly logistics. We debated about having a local carpentry school cut it for us, then searched for ways to replicate it ourselves. In the end, we came pretty close to matching it by using 4 different pieces of ready-made wood – a regular board, a 1/2 round, a 1/4 round, and a piece of fancy molding.
The pieces were glued together with construction adhesive, then finish-nailed into the wall. They’ll look very purdy once they’re painted. Having this molding up makes a huge difference – the room finally feels “finished”.
This isn’t the full extent of our weekend activities, but I’m going to save something for later – this is excitment enough for one post ;)


Comments, Thoughts, and Feedback
The door looks great. I can totally identify with all the steps to getting it right. I just did a pair of exterior doors and probably should have resanded and stained but after days of stripping, cleaning, staining, and hanging I was about at the end of my rope. I know it was all worth it though.
My doors are exterior and right now there’s no storms so I did add a single coat of satin finish-oil based poly (which took forever to dry). The poly sheened the doors up a little more than I wanted but I’m sure it will dull a bit over time.
I’m a huge fan of your site and read it often. Check out my recent project:
http://blogs.timesunion.com/homerestoration/
The door and the baseboard look awesome!
We love to hear from you, dear readers.