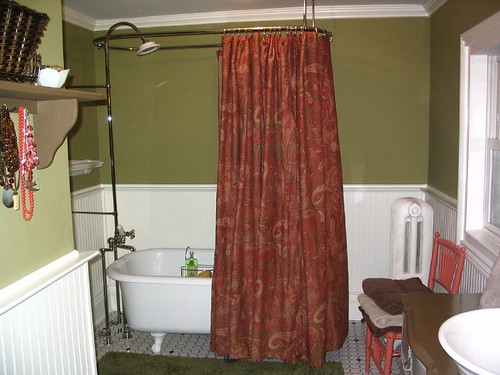
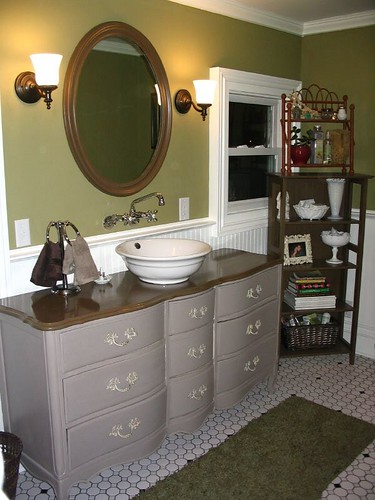
After nearly three months of work (that’s 12 fun-filled weekends, plus the work we squeezed in on weekdays), the master bathroom remodel is officially done. We put the finishing touches on it this past weekend. And now, every time I walk in there, I marvel at the beauty and order we created out of total chaos.It was one of those projects that consumed me so fully, it’s hard to believe it’s over. All that research, all that work, all that expense, all that build up…. and then POOF, the excitement comes and goes in a whirlwind. Don’t get me wrong, I’m absolutely thrilled to have the project completed. Not having to stress about it has lifted a tremendous weight off my shoulders, and I’m loving the all the extra space, the pretty fixtures, and the overall newness of it. But a part of me has already mentally moved on to the next project. That’s sick and twisted, no?
Maybe we’re addicted to the “look what we did!” euphoria. It reminds me of a runner’s high. One minute you’re exercising so vigorously that you’re barely able to catch your breath; your muscles are resisting every single step, and your mind is begging you to stop. And then out of nowhere, you suddenly feel like you could keep going for hours. You’re recharged, energized, and invicible. You’re ready to run another mile, or three… or move on to the next house project!
Anyway….. I know you’re more interested in the photos than my babbling, so let’s get to it. I’ll include some before pics so you can see just how much things have improved here at the Fixer-Upper.
Old shower and tub:

New shower and tub:
Old vanity/sink:
New vanity/sink:
Old toilet area (which had a partial wall seperating it from the shower area – see floorplans for details):
New toilet area:
Old view from the hallway:

New view from the hallway:
I love everything about it; the color scheme, the materials, and the extra space make it feel really extravagant. And our creative use of thrifted stuff (like the dresser-as-vanity), salvaged stuff (like the clawfoot tub our good friends were kind enough to donate) and gratuitous recycling of things we already owned gives it a very unique feel.
I will go into more detail about some special solutions we came up with for specific problems (like a place for shampoo bottles and my newest jewelry organizer!) in my next post… right now, I’m off to clean the tub so it’s ready for a nice romantic Valentines Day bubble bath!
If you want to see our full photo set, including all the before and afters, head here for a slideshow:


Comments, Thoughts, and Feedback
From grot to gorgeous. Congratulations.
B E A U T I F U L !!
Enjoy the bubble bath~
Wow, it’s beautiful! Nice job. Enjoy that bubble bath!
It’s charming and lovely! And dude, I’d forgotten what a nightmare the old tub was. How psyched are y’all? Fantastic work!
I can’t believe it, you guys! Well done! So pretty!
Total aside regarding shower curtain: In our apartment clawfoot tub (which I miss, I MISS!), we had to cut off the bottom 2-4 inches of our shower curtains so that we weren’t walking on them. I can’t tell if that would be the case for you, but wanted to mention it.
Woot! It’s absolutely wonderful! I can’t believe it’s sitting where the old bathroom used to sit as there is zero resemblence. Fantastic work you two!
How did you finish the wood top on your vanity for your sink? we are done a wood top as well…..any hints and help is appreciated!
Looks fantastic!
Great job!
I absolutely love the dresser turned vanity.
Nice! :-) Finishing a bathroom is one of the most satisfying feelings, isn’t it!?
Thanks, all – we did enjoy the bath and I was amazed to find that our hot water tank holds enough water to fill the tub up completely. I LOVE a super hot bath, the kind that turns my skin lobster red, so this was a very exciting revelation for me.
I felt very Meredith Grey soaking in my tub with bubble surrounding me ;)
Donutboy – we put 3 layers of spar varnish over the top the vanity. Hopefully this is enough to keep it safe and pretty. The spar varnish holds up very well on our exterior doors etc, so I imagine it can hold up to some minor splashing.
totaly fab, thes projects are always sooo much work, but such big payoffs. im a little interested in the solution for the bottles. looks like an over the tub basket,
Beautiful job- it looks unique too, I like all your unique touches. It is a very good feeling to have a nice new bathroom especially when going from one so dingy. We had one just as bad here. Congrats!
Wow! Every time I scrolled from the before photo to the after, my mouth dropped open! Every time! I’m so impressed! Note the exclamation marks! :)
Now I’m just that much more excited about finishing our own project!
Hi there, great remodel. I was wondering how you managed to “seal” the original faucet mount on the clawfoot tub? I see in the before picture it had typical hardware, yet in the after shots you’ve added some fancy taps that are floor not tub mounted. “how’dya do that?”
Thanks for your time,
-Star*
Hi Star,
We actually had the tub refinished professionally, and the refinisher filled in the holes for us. You’d never know they were there!
Check out this post for more info:
http://www.ourfixerupper.com/clawfoot-tub-refinished-and-amazing.htm
The tub finish is holding up extremely well. It still looks brand new. I highly recommend going with a pro for refinishing, it cost us about $450 but was worth every cent. He made the outside of the tub (which, on old cast iron tubs, is normally very rough and bumpy like an orange peel) smooth as well.
I really like your bronze wall sconces, Mindy. Can you tell me the model , and where you purchased them?
Hi Lora,
We bought those bathroom scones at Home Depot – I am pretty sure they are Hampton Bay. I can’t seem to find the exact model on their website unfortunately. They came with an amber colored glass shade that was more bulbous; we swapped those out for milky-white shades.
Sorry I can’t be more specific, I will try find the model name/# the next time I go to Home Depot!
very nice..we are currently undergoing a huge renovation here..we have an old victorian that the owners before us butchered..we are currently working on the teeny downstairs bathroom and just bought a 4 foot clawfoot at Rehouse in Rochester. just curious where you got all your bath fixtures? the bathroom came out beautiful by the way. =) we are going with a similar theme, the wanescotting and octogan tile floor..
Hi Fixerupper people!
If you are looking for a beautiful renovation project and are outpriced in the UK we are selling a very pretty farmhouse that has bags of character which as renovations go is in good condition but needs some love and attention. The farmhouse has high ceilings and original wide oak floor boards. Price is just 48500 Euros. Its located in a Pretty Slovenian farming village. Slovenia is just 2 hours from UK and all European passport holders as well as American passport holders can buy here. No limited company to set up. Email me and I will send you pictures!
Hello!!
We’re going to be renovating our own master bath soon, and we love love love what you’ve done with yours!! Can you tell us what paint color you used for the walls? Love that green!
Sincerely,
Sara
Okay, first off, the remodel looks amazing. I love the old/new feel of the whole room, especially the dresser as a vanity. Second– who puts carpet in a bathroom?! Doesn’t that just seem impractical? Sometimes I don’t know what people were thinking…
-Molly
Antique Jewelry
We love to hear from you, dear readers.