Alright, housebloggers – maybe one of you can help a homeowner in need. One of our commentors wrote in with this question:
I just refinished a clawfoot bath tub with one problem the feet won’t stay in the grooves I was wondering if you had any suggestions…
Please help???
-Ricci
Our tub came with it’s feet attached, so we didn’t run into any issues like this. Sounds like a question for Allan over at The Daily Tubber, so maybe he’ll hear our plea.
Anyone else have ideas or suggestions?

On Saturday we returned to our roots and put in an all-out, full-throttle, no-holds-barred day of work at the house. Back in the day when we were young and fresh, we’d do at least one of these every weekend. We regularly knocked out 24+ hours of work on our two days off, but that was back when we had holes in our walls and cat urine seeping out of the hardwoods. Extreme embarrassment tends to make you move a little faster.
It was fun throwing ourselves into a project once again – we’ve been laying low lately, and I really missed that feeling of accomplishment at the end of a hard day. My creaking, achey body wasn’t quite as enthused about the rigorous activity, but it’ll adapt.
We marked off our lines and 8′ sections earlier in the week so we could get straight to digging when the weekend rolled around. We used string, a few wooden stakes, and mini flags to do this. Before digging, we checked these measurements one more time and spray-painted the ground around the flags so we could get them out of our way. (Be sure to get the upside-down friendly “marking spray paint” for this purpose.)
We rented a 2-man auger from Home Depot on Saturday morning. It was about $50 for a half-day rental, well worth it for the time it saves. They have 1-man and 2-man versions – we went with the big guns since we had 27 holes to dig. Teague’s truck bed was absolutely full of construction debris, but shockingly the auger fit in the backseat of my Toyota Corolla. The auger bit comes off for travel, but the handles had to stay on. One handle ended up hanging out the back window about 2 inches. It was almost as big as me – here it is all put together :

Teague took the pic, so you can blame him for cutting my head off. When they say two-man, they aren’t kidding. This thing is a BEAST. It’s very heavy and hard to maneuver. One person runs the throttle while the other pulls the choke. When you let up on the throttle, it automatically shuts itself off. It was honestly kinda scary to use at first bccause it really “takes off” when you start it up – but we got used to it pretty quickly. It made light work of the digging. Each hole took about 30 seconds to dig, I’d say. The hardest part was carrying it from point to point.

As you can see, it throws the dirt everywhere and digs a nice round hole. We have hard clay soil, and at about the 2′ mark it would start to buck and resist. That’s about when it hits this type of soil:
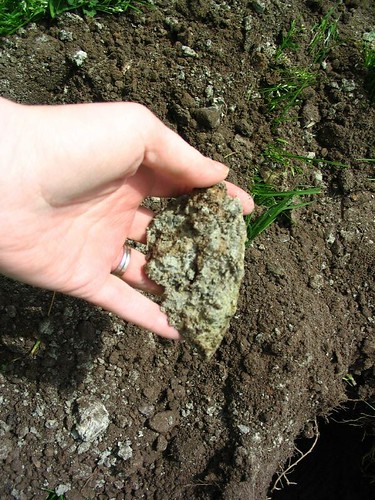
It becomes a weird whitish-gray color and is VERY hard to dig. We had experience digging this out back when we put in a french drain at the back of the house. It was tremendously hard to dig out, and even harder to put back into the hole once it had solidified into a giant heaping pile. We decided 2′ was plenty deep for a 4′ fence post, and didn’t fight it.
The holes were all set by noon; we used a post-hole digger to clean out any remaining debris, and started setting our posts. We used Quickrete to set them – it took about 3 80# bags for every 2 posts.
Setting them was pretty tedious and time consuming. We had to constantly mix concrete batches (in a wheelbarrow), check that our measurements were correct, and make sure each post was level and lined up straight. We also set stakes on either side of the hole with a brace in between, which we nailed to the posts temporarily to keep them level. It took about 15 minutes per post from start to finish.
We purchased a great little post-leveler tool at Home Depot that helped tremendously. It looked like this:

The rubber band straps it onto the post; it’s easy to keep an eye on and move from post to post. For $4, I highly recommend picking one up!
Here, you can see the braces we used to keep each post in place:

By end of day Saturday, we had all the holes measured and dug out and 16 of the 27 posts set. We finished up yesterday, cranky and tired but relieved to have the not-so-fun part out of the way. Once the concrete sets we’re ready to start putting panels on!
The fence debate has been decided. It wasn’t an easy one – it turns out there are many factors to consider when choosing a fence, and 3 different ways to tackle the project. Well, 3 we considered anyway…

How could we not fence the lawn in, when Bruiser looks so pathetic in his teeny-tiny fenced-in area? Doesn’t that face say “Born to Run”? And yes, the dandelions in our lawn are bigger than our dogs. So what?
Option 1: Have a professional build and install the fence on-siteThis is the most expensive choice (no surprise there) and would also be the quickest route. We called 3 contractors – only one bothered to follow up on our inquiry, and that company spent about 5 minutes with us before writing up their estimate.
Pros: Job would require very little effort on our part, would be done within 2 weeks (they set it up one week and come back the next week to shape the top edges)
Cons: About 3.5 times more expensive than doing it ourselves. Not sure the job would have been done up to our standards. The meeting we had with them felt very rushed and vague. It was hard to see how they had worked up an accurate estimate since they did not ask us many questions or go over details.
Option 2: Buy materials from a fence company, build and install it ourselves
We called around, and found that we could buy nice cedar or hemlock “kits” for picket fence from a local fence company. We went to the showroom and were impressed with their quality and the time they took to work with us. They helped us to lay out the fence and then worked up a materials list based on our requirements. They would order all materials (pickets, boards, posts, end caps, door hinges, etc) and drop them off at our house within 2 weeks. We would then be responsible for building the fence.
Pros: No need to source out materials, and they get dropped off at the house. Nice, high quality stuff.
Cons: We would have to build the entire fence, which would be time consuming. This is Teague’s busy season, so the fence might never get done! Also, the price was still too high for us – but if we had more time nad money we would definitely go this route. We could have a very nice cedar fence for about 1/2 the price of what the pro was offering – the the pro was going to use pressure-treated.
Option 3: Buy pre-built 8ft sections from a big-box store, install it ourselves
This is what we have decided to do. It’s just a backyard fence, after all – we’re getting it to give the dogs somewhere to run, and to give our giant expanse of a yard some definition and coziness. It does not have to be the most majestic fence the neighborhood has ever seen. We were getting very caught up in daydreams, but in reality this option is the one that will allow us to get it done within our time and budget constraints so we can enjoy it THIS summer instead of next. Home Depot has a style we like for about $30/8ft.
Pros: This option is by far the cheapest, and is a good compromise between building it from scratch and having a contractor come put it up for us.
Cons: The wood won’t be as nice, and I am sure the workmanship on a $30 panel won’t be top notch. We’ll still have some work to do, like digging 30 post holes. (We’ll be renting an auger for sure!)
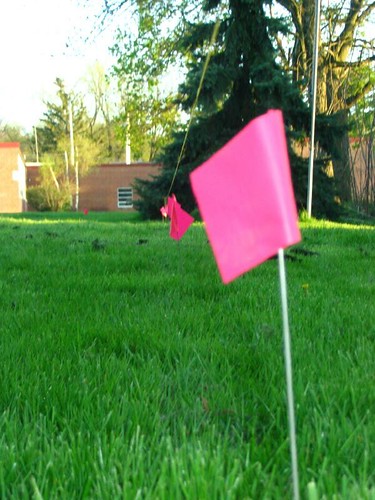
We marked off the fence lines tonight, using little flags for each post hole. There are about 30 of those decorating the lawn now, so everyone in the neighborhood knows what we’re up to. Hope they don’t start moving them around just to mess with us.
Nero was not very excited about our new fenced in area. He was more interested in going back inside to lay on the couch. God forbid he spends anytime out doors being a real dog…..

Time to repaint this side door, eh?!
Stay tuned for more fence fun this weekend!
Got a hip house-loving mother to buy a gift for? (Mother’s Day is Sunday, don’t forget!)
I saw these on Etsy today and had to share:

They are handcrafted “This Way Home” earrings by The Muses Jewels. I think they’re very cute, and can represent both a house and an arrow pointing you home. There’s also a ring available in this design.
Snag them here:Â http://www.etsy.com/view_listing.php?listing_id=5879567
Etsy, by the way? Is the best gift-giving website ever, if you have friends who love artsy craftsy things. It’s like a big giant craft fair online. Love it. Check it out: www.etsy.com

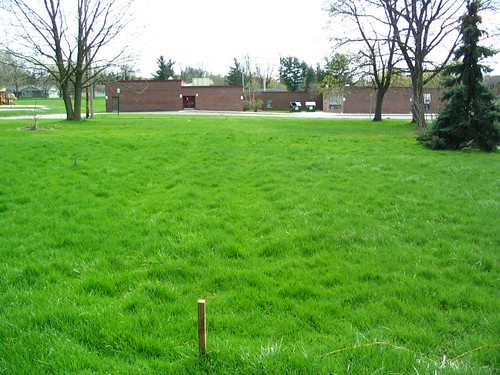
That, my friends, is our grass. I didn’t even Photoshop it to knock up the green, I swear to God. After the @#$!!# blizzard in early April, we had a whole bunch of rain. And when the rain stopped and the sun came out, everything in our lawn shot up about two feet overnight. You think I’m exaggerating, but I would go to bed one night and notice the next morning that there was an eight inch bush where only dirt had been the day before. Spring is pretty amazing here in the Northeast. It almost makes up for the miserable 6-month endurance trial that we call winter. Almost.
By Friday, it became evident that the first mow was upon us. With many, many mows to follow of course. But the first – oh, the agony of the first. Because we have an old push mower (no fancy-pants rider for us) and about 1/2 an acre of lawn. And by the time we get around to that first pass, the grass is always 5″ tall and thicker than Jessica Simpson’s hair extensions. No mere push mower should ever be responsible for such a tangled mess.
I hate to admit it, but I can’t even start our mower… it takes a soft touch and one quick pull, and I just can’t get it right. Believe me, I have tried -I feel so girly having to say “Can you start this scary machine for me, sir?” – but it’s no use.
I started with the front lawn, which was easy enough. But as I made my way to the side lawn, where the grass gets thicker, it started stalling out on me. Every few feet I had to “lift and bounce”, knocking the wet clumps of grass off the blade so it would stay running. I was full of dread, knowing that a full stall meant the end of my lawn mowing excursion.
I powered on, slowly, with the blade set as high as it would go. I held my breath each time it threatened to stall. I fretted over the gas… would one full tank be enough? Running out would be disasterous. But then, as the hours wore on, I started to become one with the mower. I developed a zen-like focus, anticipating what grass clumps would make it shudder, slowing it down and speeding it up as the length and thickness changed. My progess sped up, and my “lift and bounce” maneuver was needed less frequently. I’m sure the neighbors were watching with bated breath to see who would win this battle; the lawn had a good head start, but I was in the zone.
2.5 hours later, the first mow of the season was successfully completed with one tank of gas and zero stalls.
The glory is all mine.
No, we haven’t grown tired of our own (extremely luxurious to soak in) clawfoot tub. But we have friends who aren’t quite as thrilled with the style as we are. They are getting ready to remodel their bathroom, and they are saying goodbye to their clawfoot tub.
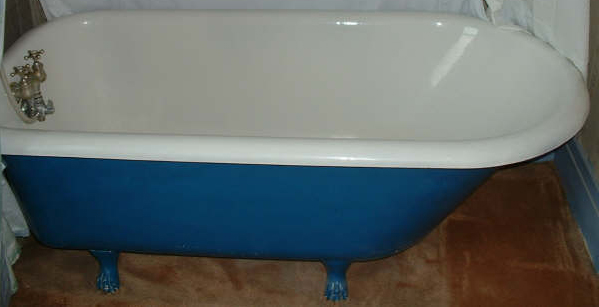
It’s a great tub – I’ve seen it in person, and it’s in good shape. It would not require refinishing unless you want it to look brand new. In which case I’d recommend Ed Shampine of Cicero, who charges about $400 – $500. He did ours and it was worth every penny – you can see the results here.
The outside is painted blue, and it has nice ball and claw feet. It’s 5′ long and 2.5′ wide, which is the same size as ours. The faucet and all fixtures are included so you won’t have to sell your youngest son for shiny chrome, unless you really want to.
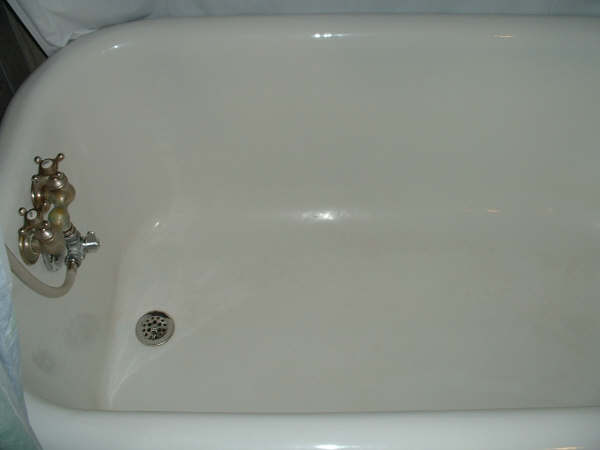
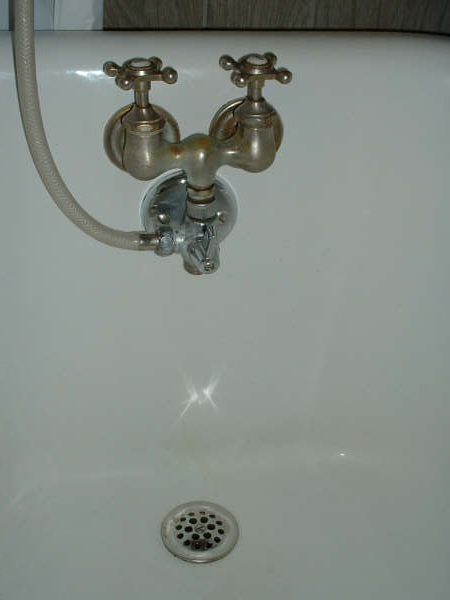
They are asking $150 (o.b.o.) for the tub and all faucet/shower parts, which I think is very reasonable. I have seen similar tubs at ReHouse NY (Rochester, NY) and Historic Houseparts (Rochester, NY) priced at $300+.
The tub is currently residing in Sherrill, New York – so this one’s for the locals only :) All in all, it’s a great deal and a great tub – I am hoping it ends up in one of our readers’ bathrooms!
If you are interested, email Katherine at dammer7 @ hotmail.com (and remove the spaces on either side of the @ sign, I’m just protecting her from spam!)
And if you need someone to install the tub once it’s yours, Wagner Design and Construction is very familiar with the ins and outs of clawfoots!
We decided most definitely NOT to paint the exterior of our house this year (time and money being two key factors) but that doesn’t mean we’ll be slacking off all season. Some type of progress must be made, because right now I don’t know what to do with myself when the weekend rolls around there is no big project to dive into. It’s not natural to me anymore, all this free time. Relaxing is perhaps a talent one must practice regularly to enjoy, because I can’t seem to take delight in it. I keep finding weird time-wasting things to keep busy with so that I feel “productive”. If it gets any worse, I’ll be putting my canned goods in reverse alphabetical order, cross-referenced by season.
So, we’re back to talking fences again. We spent a lot of energy last spring debating about what type of fence to buy or build and what portion of the backyard it should cover. Then, just when we had it all figured out, we ran out of mental energy and just gave up.
This year, I am determined to get a fence up. The dogs are driving us batty and could really, really, really use a yard that they can run around in safely. All the walking in the world does not seem to tire Nero (our min-pin) out, so maybe some leg stretching and green-grass-rolling will help his psyche. Plus, Teague is determined to get a small deck put up out back and it’ll be much cozier if there is a fence surrounding it.
We did talk to fence companies to get some price quotes, but the labor costs are extraordinarily high. Even with a hefty tax refund in our pockets, it’s out of our league. So, DIY it is. We’re already the proud owners of a post-hole digger, so Teague is going to have to teach me how to use it. Based on the area we plan to fence in (about half the back yard), we’re planning on buying 25 8′ sections of fence and putting in two gates. That means close to 30 post holes. Imagine what buff biceps I will have when I’m done digging! You’ll be needing tickets for the gun show pretty soon.
We’re going pre-built and affordable, so the style will most likely be a traditional Cape Cod picket:
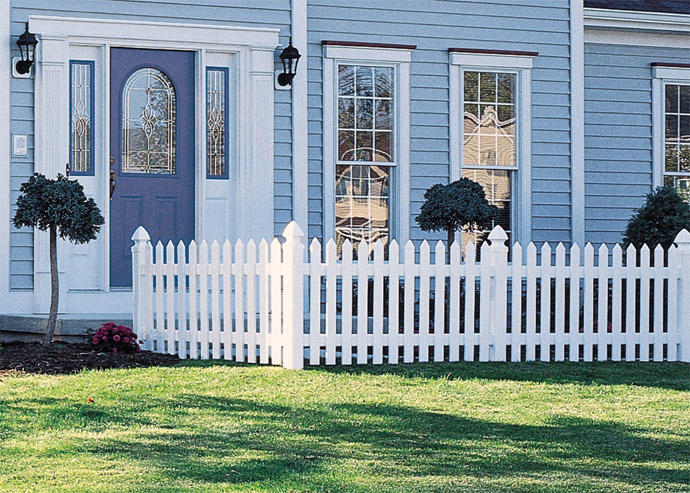
Lowes and Home Depot both sell 8’w x 4’h high sections of pressure treated pine in a similar style. Cedar is quite a bit pricier (though obviously better looking) and vinyl is just out of the question for me. I am not a fan of shiny fences!
I absolutely adore the look of white painted fences, and this would match our house trim and the Victorian style. But I don’t want to have a maintenance nightmare on our hands. We’ve got enough to keep up with already, so paint is probably out of the question.
I’m curious about white washing, a technique that was used frequently in the 17th and 18th century both indoors and out, and used mostly for exterior purposes (fences, barns, etc.) in the 19th century. Does anyone have experiene with it firsthand? I always assumed whitewash was some type of paint, but it is actually a thinned down plaster made from hydrated lime. I found plenty of articles with recipes, and the process itself doesn’t seem tough. But I can’t find any information about it’s wearabilty. I did read that white wash does not peel the way that paint will, so it should degrade more gracefully than, say, latex. Is it something we’d have to re-do every year? Every few years?
Thoughts? Suggestions? Bueller? Bueller? Anyone?
Some interesting links on whitewashing:
How to whitewash – Directions and a recipe from ehow.com
Whitewashing tips – Tips and technique AskTheBuilder.com
Whitewash receipe – A recipe and directions from the Old House Web forums
We have entered a remodeling blogging contest over at RemodelingMySpace.com. The voting just opened up, so now would be a great time to show us some love and go vote! And then if you really love us, you can vote again every day for the next 4 months because the contest runs until September 1st.
The grand prize is $5,000 – a very significant chunk of change. A chunk of change which of course would go right back into our house, so really you’d be winning too because you’d get to see us spend that $5,000 on remodeling projects. See? Win-Win.
You will need to register with the website in order to vote. (*Please ignore my bitter rantings and see my edits at the bottom of this post) They require an email address, which means you’ll probably receive email newsletters or some other form of contact from RemodelingMySpace. They have some great content including how-to videos -that the home improvement crowd will no doubt enjoy should it arrive in their inbox. But if you find their emails aren’t useful, it’s easy enough to hit the Junk Sender button ;)
Vote for us here: http://www.remodelingmyspace.com/contest-entries/our-fixer-upper
(Or click on the button in the top-right sidebar)
Maybe this’ll get me moving on the site redesign I had so hoped to launch about 6 months ago and STILL haven’t started….
*EDITED TO ADD:
Paul of RemodelingMySpace.com wrote a very helpful comment about why they are requiring emails – and it’s not to spam you with junkmail ;) Was the bitter jaded web designer in me showing through or what??
I can attest to the fact that I’ve been registered with RemodelingMySpace for about a month now (I think?) and I have not gotten any junk/spam from them. I’ve also found some really great content on their site so I do hope you’ll all take a look at what they have to offer.
I’m all for e-mail newsletters and educational stuff, as well as contests. I just know some of our readers aren’t home improvement types (they’re family and friends) so I was giving them an “out”. Didn’t word it quite right, though!

Tell me this isn’t the most hilarious garden gnome you’ve ever seen. His name is George. Apparently those crazy gnomes work so hard, they can’t even slow down to take a crap! And we thought we had it rough…
He is out of stock until May, but I’m bookmarking it so I can get one the minute it comes in:
http://www.gnomeoutlet.com/George-Working-on-Toilet-Gnome/cid29skuWG802Â
As if HGTV has not sucked up enough of my time with their non-stop stream of DIY and renovation tv shows, their website has a new feature in beta that I could seriously get addicted to. It’s called “Rate My Space”.

Basically, you upload photos of a room in your house (or your garden, yard, etc) and the community rates it. Just a voyeur? Just rate everyone’s stuff. It’s a “Hot or Not” for the house crowd.

You not only get to rate the spaces, you also get to leave feedback. And the photos and posts can be tagged, making searches that much more useful. If you’re daring, you can create an account and let people rate your own personal blood, sweat, and tears. I threw our master bathroom up there to see how it went, and so far it’s rated a 3.5 out of 5. Not bad – the comments are helpful (mostly) and it’s nice to see what people outside our little blog world think of things. You can see all of the feedback here.
My one complaint is that it’s majorly slow. But they don’t call it “beta” for nothing – hopefully the speed issue will be worked out soon.
Check it out – I know you all need one more internet time-waster: Rate My Space
|

