Our sleepy little neighborhood has some swoon-worthy old houses for sale right now. Half of them are on the same road, including two pink ginger-bready houses, a gray Queen-Anne style, and an Italianate that we use as our role model. In fact, three of the houses were on our walking tour post. I’m not sure why half the neighborhood is taking off, but it’s a great opportunity to buy your own fixer-upper. And in case you haven’t noticed, the area is VERY affordable!
Here’s the Italianate – it just went on the market a few days ago, but it’s up on the web here – for $157,000, you can have this and the huge carriage house that goes with it!

We love this color scheme, by the way. And the porch. And the awesome porch light. Mmmm.
Here’s the pink gingerbread – the sign out front says Price Reduced and Agents Welcome, I think they’re having trouble selling it so somebody ought to make them a deal!

Just a heads up to those of you looking to get into your own old house ;)

When we gutted a third of our upstairs in order to remodel the bathroom, we had a golden opportunity. Restructuring this area of the house meant we could put the walls wherever we wanted. So we made the bathroom about 4′ wider, and used the leftover space to make a closet.
All old houses lack storage space, unless they’ve been through a miraculous remodel. Apparently, the Victorians just didn’t collect the same amount of total crap we do today. They probably didn’t feel the need to own 22 pairs of black dress shoes. How ever did they get by?
Adding the closet was not difficult. It’s a bit of framing and a lot of drywall, but if you have an empty spot somewhere in your house that is going to waste, it’s a doable DIY job. We even got fancy and added an overhead recessed light (oooooh) and trim.
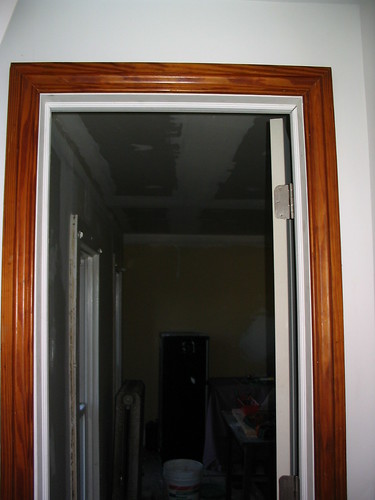 
Yup, trim. Why trim out a closet that no one will ever see? Well, partly because trim makes a HUGE difference in how a room feels. But also because we had leftovers from a pile of salvage trim we bought about a year ago – just enough to do the interior of this little closet.
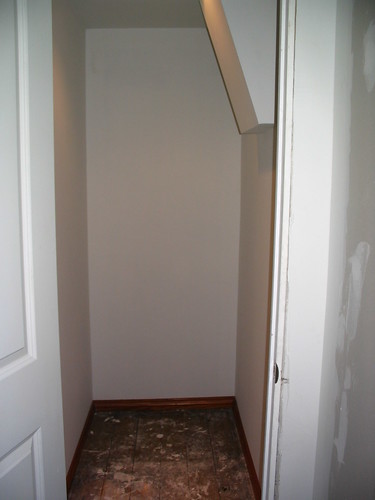
The trim will get a coat of white paint to match the rest of the house. And someday, the floor in there will get addressed. But the walls were primed, so as soon as the paint dried I filled it up. And every day, I am thankful because I no longer have to look at a big pile of junk in our bedroom.
Want to add your own closet? Here’s a few articles to get you started:
Build A Closet – Ask the Builder
How to Build a Closet – HGTV
Build a Closet – The Family Handyman
Not ready to tackle a full build? IKEA has some really affordable storage systems (like the Leksvik and Hemnes) that would do the job. You still need to screw things together, but you can handle that!
We have a habit of leaving little tasks undone for far too long. It’s not the big things – we’re good with big things – it’s the little stuff that I notice every single day and yet never take ten minutes out of my day to correct. Somehow they seem too small to bother with, yet too in-your-face to ignore completely.
For instance, we had some leftover hardwood floor dust on one wall in the living room, way up high where I couldn’t reach it even when teetering on the arm of the couch. A Swiffer duster or a broom was all I needed to grab it. Yet, for nearly year, there it sat. Staring me down, daring me to come wipe it off.
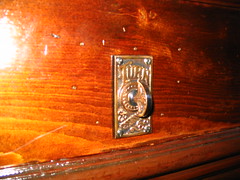
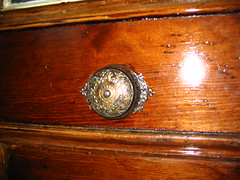
Another case in point – our lovely reproduction doorbell. We bought this doorbell a few months after we bought the house. We LOOOOOOVVVVEEED the doorbell. We couldn’t wait to put it on the door. Yet, two years later, there it sat in it’s cardboard box just waiting to see the light of day.
But look, now it’s up! And the briiinnnnngggg noise it makes? It’s lovely.
We had a party at our house this past weekend, which finally gave us the motivation we needed to do some of those little chores. Like the doorbell, and all that silly dusting, mopping, and vacuuming that the rest of the world does regularly. The house is slightly less hazardous to our health today, but I give it 3-4 days before we’re sucking up 2′ tall dustballs again.
The thing is, it feels great to have those little things taken care of. And they only took a few minutes here and there. So there has to be a way (other than regular house parties) to shame ourselves into taking care of the little annoyances when we notice them. Why spend 365 days getting mad at a dust cloud?
Enter the “DaysAgo” digital counter. It’s meant for food items (like the scary Tupperware in your fridge) but has many other applications. I think one of them could be the “how long have I been staring at this nasty @#?!# in my house” timer.
It counts the “days since” for you, all the way up to 99. When the timer hits, say, 30 days you know you better take care of the chore before it sucks up any more of your mental energy.

They’re 2 for $10 – get ’em today at http://www.howmanydaysago.com/
From the moment we moved into this house (almost 2.5 years ago) I knew the exterior paint scheme had to change. It’s not awful, mind you – the paint is not peeling or blistering. And it’s not neon orange – the main color is a robin’s egg blue that is almost (but not quite) charming and the trim is white with maroon accents. The problem is, it’s just not US. It’s not the color scheme we imagine when we close our eyes at night and picture our house as it will someday be.

It’s also not particularly flattering to the house’s architecture. A great paint job should make all the great details pop; right now, your eye jumps around from bit to bit. There’s no balance. When it is painted with a more sophisticated color palette, it’ll be so gorgeous that we’ll pull around the corner every day and feel our hearts flutter. All sins (and credit card debt) will be forgotten. The crush we had on our house, that love-at-first-sight feeling, will no doubt return.
But we might have to wait a little bit longer for that feeling.

We’ve been doing some serious soul searching as of late, wondering if our plans are just a bit too ambitious. Restoring all of the exterior woodwork, scraping and prepping, priming, and then painting the entire exterior and all of the trim within Central New York’s handful of decent weather months will be tough. Impossible, maybe, without some serious sacrifice both mentally and physically. And even though we both desperately want the house painted, neither of us are particularly enthusiastic about doing it. Sigh…… if only we could stumble across a secret tin of money somewhere in the basement, we’d hire a pro in a heartbeat!
So, we’re at a crossroads. We haven’t officially decided one way or the other. But if we’re this hesitant to jump in, I’m pretty sure we’re not ready for the whole shebang.
Yesterday, we came up with a new (less intimidating) gameplan. We decided we’d tackle things that’ll make the paint go quicker next year, and maybe make a few fun upgrades we’ve been putting off. Our short list is:
- restore the exterior woodwork
- remove the rotting exterior entryway to a door that no longer exists (not original to the house)
- create a fenced in area for the dogs to run in
- build a small deck out back to entertain and relax on
- put a ceiling in the porch (nothing there now), add trim and detail to the columns, possibly replace the floor
These things, along with the many interior projects we’ve got half-done at the moment, could keep us plenty busy. And after 2+ summers of intense, work-filled, no-fun weekends we both feel like it is time to slow down and just ENJOY the house for a while. Time to do the things we haven’t done much of since we bought it, like camping and kayaking and reading books and sleeping in. We’re finally (maybe?) ready to give in and let ourselves slip into a less taxing pace. At least for a little while!
Who knows – our minds could change 12 times in the next 2 days – it’s very hard to let go and resign to slow progress even when it means more FUN. But for now, I think we’re going to take the road less chaotic.
I mentioned in a previous post that I have a newfound respect for the Valspar paint brand found at Lowe’s. I’ve only used the interior version, but got thinking that maybe their exterior would be worth looking into since we’re (…big deep breath…) hoping to paint the house this spring/summer/fall.
We’ve got plenty of scraping and repairs to do before we get down to actually painting, but I’m always much more interested in the “make it pretty” aspects of the job so of course that’s what I’m focusing on.

Anyway….. I notice that Valspar has a line of paint called Duramax that is (according to their data sheet) self-priming. Meaning, one less coat of paint to apply to our giant house. Meaning, major money and time saved. Never in my wildest dreams did I imagine there was a self-priming exterior paint out there that would remove the priming step for us. It sounds way too good to be true, which means it probably is. Has anyone used this type of paint or heard reviews (good or bad) about it? I couldn’t find anything specific online.
This is for all you WordPress bloggers out there…. everyone else can ignore the geekery to follow.
A few weeks ago, I upgraded WordPress (the software this site runs on) to version 2.0 – about a week later, I noticed that my tags (keywords chosen by me to help you all find related content – see the links next to “similar posts” at the bottom of every post I write) were disappearing. But only after someone commented on the post. Weird, right?
I found the solution, and luckily it’s an easy fix.
If you’re having the same problem, open up ultimate-tag-warrior-actions.php and ultimate-tag-warrior-actions-wordpress2.php (found in your UTW plugin folder).
Find this line:
function ultimate_save_tags($postID)
{
and add the following directly below it:
if (!is_admin()) return $postID;
if (!isset($_POST[‘tagset’])) return $postID;
You’ll have to re-add tags where they disappeared, but old ones show up just fine.
This weekend, we puttered around yet again with the craft room and closet. Skim coating drywall is B-O-R-I-N-G. I hate waiting for one coat to dry just so we can go put another thin-as-can-be coat on it. Good technique means very little sanding. That’s the only reason I haven’t gone beserk yet.
The only interesting (exciting being a relative term here) things worth mentioning are:
1. The closet drywall is finally done! And walls are primed, so crap will be moved in very soon.
2. The craft room ceiling seams got taped

The ceiling seams were wonky, since we went over the old ceiling and didn’t drop down and level it out at all. We didn’t want to lose the height (it’s a low ceiling already) and figured a little funkiness was ok in a room whose sole purpose is to hold craft supplies and laundry. We used a steel-reinforced corner bead tape called “Sure Corner” on the outer walls. It’s available at Lowe’s (and probably Home Depot) for about $12 per 100ft roll.
This is what the back side (wall-facing) of the tape looks like before you crease it:

The box it came in, so you know what to look for when you’re shopping:

This is the first time we’ve used Sure Corner in our house, and I was pretty impressed. It made closing the gaps an easier process. We still prefilled the big gaps with bondo first (dries quicker, keeps the tape from sinking in!), but this made nice clean lines on top of that. Having the seams taped makes the ceiling look about 300 times better, so I can’t wait to see the final product. No more flaking popcorn texture!
Nadja and Sean of American Four Square Renewel took our “wallpaper on the ceiling” cheat one step further, painting it copper. And the pictures look amazing! We’ve thought about doing a copper-colored fake tin ceiling in our living room, so I had to bookmark their post.

You might recall that we did a quick fix on our downstairs bathroom ceiling about two years ago, using a similar textured wallpaper. We don’t have pictures to share because we painted ours white so it doesn’t photograph well. But in person, you’d never imagine it was paper.
This paintable textured wallpaper is available at Sherwin Williams and Home Depot, among other places, and costs about $15/roll. It’s also available from most online wallpaper sources. Search for “paintable wallpaper” and you will find plenty of style options.
I am happy to report that our bathroom ceiling “quick fix” remains intact – despiate having to deal with 6 months of steamy showers with no air vent. (This was our primary bathroom when my brother lived with us, and it started out ventless.) Our wallpaper has two layers of high-gloss white paint on it, and all of the seams and edges were caulked prior to painting. The caulking is probably not necessary in a regular room, but since it was the bathroom we didn’t want to take chances. It also helped to completely hide the seams.
It was somewhat painful to put up – wallpapering over your head is frustrating – but it’s well worth it for a “tin” ceiling on a dime!
One of our commenters was interested in the colors used in our bathroom, so I thought I’d share the detailed info on our paint choices. I’m terribly in love with the way they came together.
We started the process by choosing a shower curtain – because as you’ll quickly learn, it’s infinitely easier to find (or mix) a paint color that matches your fabrics than it is to find fabrics to match a paint color. I whipped up a few Photoshop mockups and asked everyone for input, which helped greatly with the decision making process.
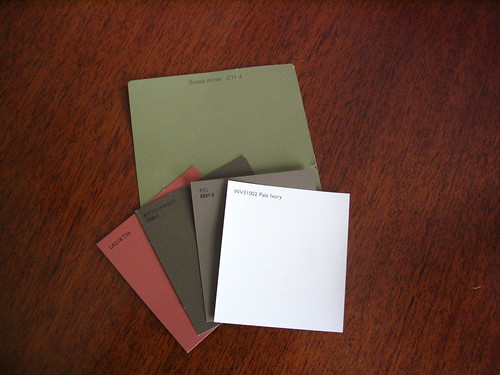
From there, we decided on the following paints from Lowes:
- Sweet Annie in American Traditions for the walls
- Tile in Valspar flat for an accent chair
- Bittersweet in Valspar flat for the vanity top and shelving
- Fig in Valspar flat for a few little accent items
- Pale Ivory in Valspar semi-gloss for the beadboard
We picked everything up at Lowe’s because we didn’t want to drive an hour in a snowstorm to pick up paint at Sherwin Williams. Convenience aside, I was very happy with the Lowe’s paint. The Valspar paint is exceptional, and although I’ve always been a Sherwin Williams girl I think I may be a convert. It has great coverage and the colors are very rich.
Do you have a color/brand you’re devoted to? I’m starting to think about colors for the craft room and need some inspiration!
Last week, Marilyn of Hauser Haus kindly pointed out that when hung the closet door so that it opened inward, we essentially cut our storage space in half. And the minute I read her comment, I went “DOH!”. How could we have mindlessly hung it the way we had, and then how we could have left it that way after seeing it in action. Why did no light bulb go off? It was so obvious, and such a silly mistake to make, but it shows you where our heads are at right now. Puttering through these tasks means we’re giving them far less concentrated mental energy, but luckily a little oops like that is easy to fix. Thanks to Marilyn, the door hinges have been swapped and it now opens outward, giving me ample space to pile crap in.
We decided to just go over the old ceiling to avoid more messy demo; what’s there now is a layer of lath, a layer of sheetrock, and the popcorn paint stuff. Someone must have taken the plaster down many years ago.

The ceiling in the craft room is hideous, so we’re sheetrocking it while we’re on a roll. It currently features a lovely “popcorn” texture that is peeling due to water damage from the formerly leaky roof. It also has a few holes from our overzealous demolition and my inability to keep from poking at things. But some of the holes came in handy, since they made joist-finding a lot easier.

We spent part of the weekend cutting and attaching the sheetrock, which is waiting for seam taping. Unlike our other ceilings which are 10+ feet high, this ceiling is of average height making it much easier to sheetrock. Thank god for that… despite doing shoulder presses a few times a week at the gym, I have absolutely no “over the head” arm strength. Ceilings are a constant source of embarrassment for me. No matter how hard I try to hold up my end of the sheetrock so we can screw it in, about 30 seconds into it my arms start shaking violently. At which point I start yelling to get a few screws in there before I drop it. The less girly screaming I have to do, the better.
|


