As I often note when I post pics of our stairwell, we’ve yet to put railings up. About a year ago we ripped out two false walls that had been constructed where the railings originally were, and despite my most optimistic hopes there were no beautiful Victorian railings hiding between said walls.
We’ve been living without any type of physical barrier between us and the big drop for about…oh…a year now. And even when we are only partially awake, we somehow manage to steer clear of that deathtrap. It made me incredibly nervous for the first three months or so, but IÂ eventually got comfortable with the situation. Maybe too comfortable – I often catch myself walking catlike very close to the edge, even when there is no reason to do so.
But not all humans want to test fate in this manner, so we figure we better work something out sooner or later. And today while browsing fellow fixer-upper Kim’s blog – TimeThief – I found the perfect inspiration. Her stairwell is very similar to ours, and the newel post style is exactly what I was picturing in my head.
Here is her inspiration:
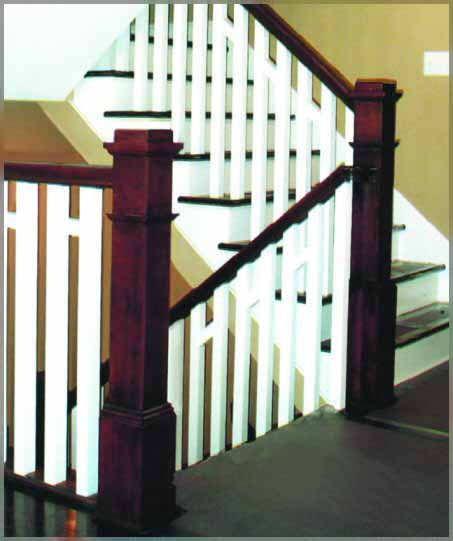
I love the contrast between the dark posts/treads and white balusters/risers. It’s very crisp and would match what we’ve done with the dark wood floors and white trim throughout the downstairs. I also really like the square balusters in this particular setup, which happen to be cheaper than turned balusters.
Here’s a picture of Kim’s beautiful stairwell in-progress:
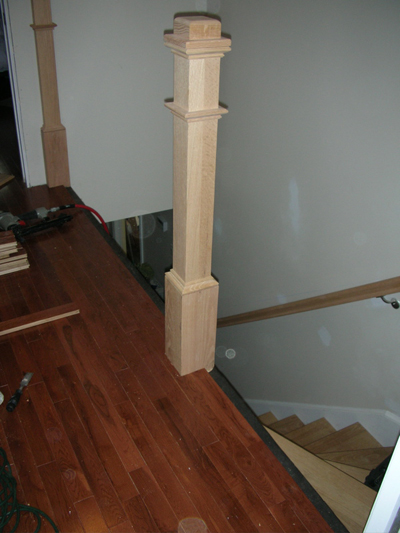
Visit http://time-thief.blogspot.com/ to see ee a bunch of photos and information on the project.
Thanks for the inspiration, Kim!

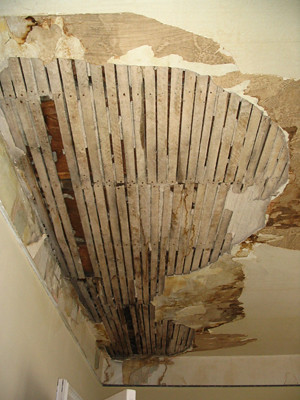
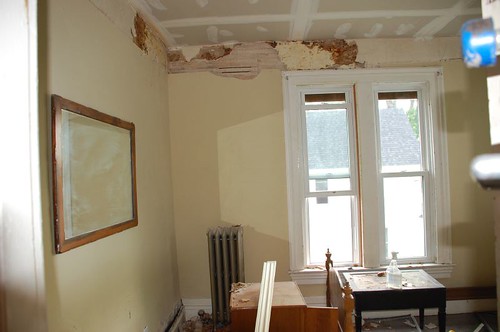
Yep, the mania continues. Fueled by fresh ground Starbucks (from the bag, we’re not fancy enough to have a Starbucks in town. I think we’re the only town in America without one, actually.) we spread our chaose into one of our spare bedrooms this past Saturday. Overall, it’s not a bad room at all. It is fairly large, has a closet and three big windows, and gets the most light of any room in the house. It’s biggest problem was the plaster ceiling – after years of a leaking roof, it was crumbling right off. When we took the drop ceilings out last year, everything else came down with them and it looked like this for about 6 months:
But we made some repairs and snuck nice new drywall up there back when we rented the drywall jack. So the hard part was essentially done – no overhead lifting of 4×12 sheets of drywall for this girl. Whooo.
Unfortunately, the drop ceiling grid had been nailed into the plaster, and the nail holes ended up ruining much of the top part of the walls. There was also had about 8 layers of wallpaper border up there, and the stuff flat out refused to come off. It took me about 30 minutes to scrape down a 1′ wide section. Frustrated and tired, we decided to forgo “saving” this top foot or so of plaster. But we did want to keep the rest of it, so we took a circular saw and ran it around the room, cutting off the border and removing any chunks of plaster that was no longer sticking to the lathe.
This particular demolition tactic worked much better than I expected, taking only about an hour. It was messy, but not nearly as messy as gutting the room would have been. Minus the bad plaster, it ended up looking like this:

Within a few hours, we had new drywall patched in around the entire room. I know it’s not exactly cool to mix drywall with plaster, but we’re not hardcore preservationists and at this point in our remodeling process we’ve given up on “perfect” in exchange for “done”.
We bondo’d all the big cracks, and once that was dry we made quick work of the seam taping.
When we gutted our stairwell and hallway about a year ago, we got rid of any door and window trim that wasn’t original. Basically, we got rid of a bunch of 1″x4″ boards that had been haphazardly nailed up. That left us with 3 doors and a window looking incredibly sad and trimless, and 2 doors looking marvelous with their beefy, built-up century-old molding.
Nice trim doesn’t come cheap, but it certainly makes a new entry feel like it fits into a very old house.

Here’s a closeup of a doorway in-progress, blending old (the inner side of the door still has it’s original trim) with new. It’s made to match the existing doorways throughout the house, using off-the-shelf pieces from Lowes. The fanciest casing we bought sits on the outer edge, on top of 1″x4″, and quarter-round meets with the 1″ at that inner edge. A little painters caulk makes the seams disappear, and after a few coats of primer and paint it looks almost identical to the original doorway casings… minus all the dings and scratches.
For more on building trimwork, check out the post we did after tackling the master bathroom. We could be accused of going a little overboard when it comes to trim, but damn – it looks fantastic.
This hallway has been through a lot. It started out like this:

You can see our master bathroom at the end of the hallway. The paneling is hiding what is now the open stairwell.
Here’s what the stairwell looked like, with some of the paneling walls still in place (pink, on the right):

The carpet got pulled up 2 summers ago because it reeked of cat pee. Then we took out the wood paneling “walls” and a sliding door that were put up where the stair railings used to be – walls and a door used to make the upstairs into an apartment with it’s own entrance. After a while, we got sick of the drop ceiling and pulled that down. Finally, we tore the place apart and took out the walls and ceiling since they were all crumbling anyway.
Since then, we’ve been pretty much ignoring it. We did put walls and a ceiling in, but we ran out of steam after drywalling. There it sat, awaiting paint and trim, right up until Tuesday morning when our burst of energy turned on it.
It’s not totally finished, but it’s very close. As of tonight, it looks like this:

See the pretty door molding? OOOOH. AHHHHHH. And, my favorite part, tin ceiling tiles (original to the house) repurposed as a wall dado:

This was actually there when we took the wood paneling off – but it was hot pink, so we repainted it ;)
It still needs a light fixture over the stairwell, and railings (ha! safety, who needs it?), and baseboards, and some type of floor covering. But hey – we’re a whole lot closer to done.
Somewhere around Sunday afternoon on our drive back from camping in the mountains of West Virginia, I got hit with a huge surge of energy and motivation. With a week of vacation in front of me, and literally nothing planned, I suddenly saw a sea of possibility. I could hardly wait to dive in to our big list of projects on Monday morning – the feeling was that strong.
I’m always shocked by how much I can get done when I’m in the mood. “In the mood” basically means manic and vibrating with unharnessed energy. Ideas bounce around in my head at a dizzying pace, and yet I become hyper focused on whatever tasks I have decided should get done that day. This week, the ENTIRE week, was a manic one for me. I was excited, and driven, and ready to tackle just about anything.
In 7 days, we did more work than we’ve done in the last 3-4 months. The fence staining is done! The hallway doors and window are all trimmed out, caulked, and painted! The hallway is primed and painted! New light fixtures are up! The french doors (in the kitchen) got a fresh coat of spar varnish! We even started repairing the walls in one of our spare bedrooms.
I guess this is proof that just when you’ve lost hope of ever getting your fixer-upper mojo back, it’ll bite you in the ass and surprise the hell out of you. And you’ll be falling into bed exhausted at the end of a long day, chunks of drywall stuck to your hair and primer under your fingernails, bursting with pride, thinking “Wow, I can’t believe we waited so long to do this……..”
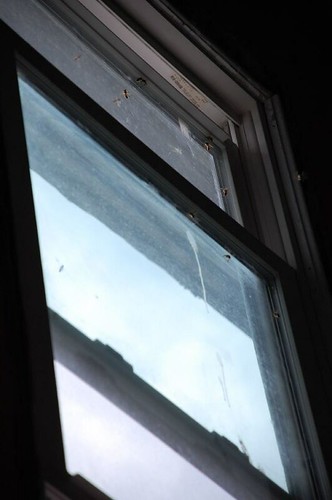
We had a small attack this morning. As we stumbled out of bed and down the stairs, grumbling about coffee and aching joints (we’re not even 30 – why so much aching?), we noticed 4 honey bees bouncing around on the stairwell window.
Still half-asleep, I grabbed a magazine and whacked one. Then another. I was just about to kill #4 when bees started coming in from all directions. Dozens and dozens of bees just multiplying before our eyes. Visions of little Thomas J. covered in bee stings in a little white coffin flashed through my head, and I freaked. I ran to the bathroom and shut the door, yelling for Teague to get in with me before they killed him. Instead, he ran to the craft room WHICH HAS NO DOOR and no good escape route. Lesson learned – in case of emergency, do not follow Teague.
We freaked out in our respective hiding places for a good 15 minutes, watching the bees take over the upstairs. A very loud buzzing could be heard through the closed door, and every time I peeked out there were more. When we realized they weren’t going away anytime soon, we decided to make a run for it. Trying not to disturb them too much, we both ran gently down the stairs through the cloud of buzzing bodies and arrived at the bottom of the stairs unharmed.
Using my handy-dandy zoom lens, I snapped a few photos. They don’t really look that scary, but let me tell you – I was totally freaking out imagining that the rest of the swarm would be at our house shortly to rescue their buddies and punish me for the death count.
We called a friend who used to harvest honey, and he calmed me down. Apparently bees follow their queen blindly, and that’s their goal in life. If she wasn’t in the house, the swarm wouldn’t be either. So these 50 or so bees had somehow gotten confused and lost, and they were just trying to find their queen. They would wander off if we just opened the window and left them alone.
About 30 minutes later, we were down to about ten bees. We shut the window and killed those last few stragglers, and have been bee-free ever since. Big relief! The next time I go to smack a bee with a rolled up This Old House, I’ll definitely think twice.
(ps – The window is disgustingly dirty because this hallway was gutted and we’re still working on it… never bothered to clean it. Not because we’re that disgusting. Although we are pretty close to that disgusting.)
We just returned from a weekend camping trip in the mountains of West Virginia, and like any good diy’er we ended up coming home with tools instead of souveniers.
We were wandering the dusty aisles of an awesome fleamarket in Harper’s Ferry with my sis-in-law Eilis and her fiance Ted – two highly-skilled treasure hunters who were a delight to shop with – when Teague came across a pair of used drywall stilts. For someone who have never had to drywall a 10-ft high ceiling, this might not seem like a find. But with at least 3 more ceilings looming in our future, they looked like a heavenly mirage.

Drywall stilts are exactly what they sound like – metal stilts that you use for taping seams, drywalling, and painting. They save you from having to move a ladder every 5 seconds to reach high-up places. They’re not for the uncoordinated (like, erm, me) but when you see someone skilled hopping around in them, you instantly see how they could make life easier.
The guy selling them wanted $50; for that bargain price he was willing to throw in a food dehydrator my eyes had lingered on for all of 3 seconds. I’ve been monitoring the cost of used drywall stilts on eBay so I knew $50 was an ok deal, but I also knew I’d never make my own beef jerky and the guy would settle for less if we offered. We countered at $30, and ended up owning them for $35.

Thrilled, we all made Teague try them on the minute we got back to our campsite “to make sure they worked”. Also for the pure entertainment of watching Teague try to balance on them. Kids, do not try this at home. Especially not in sandals, on a hill, near some giant tree stumps. I can’t believe he didn’t break a leg.
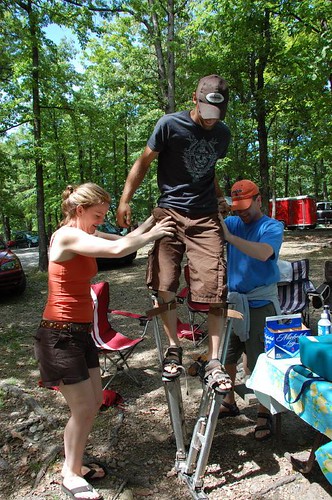
Above, Ted and Eilis make sure Teague does not go rolling down the hill when he tries to stand up.
I didn’t find anything nearly as cool as the stilts, but my favorite purchase of the day was this cast-iron cookie pan:
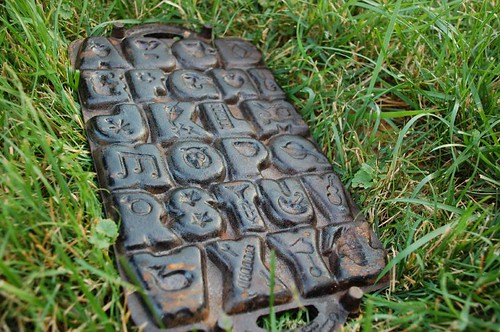
In this pic, you’re looking at the bottom side. It makes alphabet-shaped cookies. The letter M (for Mindy) is a monkey. I have a real thing for monkeys AND graphic alphabet designs, so really I had no choice but to buy it. Did I mention it was only $2? Score.
Now that we’ve had a weekend away, some good company, and a lot of fresh air, I’m feeling good. I have 5 full, unplanned days vacation ahead of me this week so I’m hoping to finish a few projects (like the everlasting fence painting) and relax with the dogs. We’ll see how long my newfound energy lasts….
Notice anything about our site lately? Like, our eternally slow progress and general lack of projects in the queu? I think it’s official: We hit another wall. A big one.

If I had to guess, I’d say we hit the wall the day our master bathroom was finished. Since that day, our motivation has been at an all-time low. So has our bank account, but that’s never stopped us before so I can’t fully blame finances for our sleepy weekends and extra couch time. There’s plenty of cheap projects we could be doing, such as skim coating and repairing the walls in the upstairs bedrooms, painting the fence, painting the hallway, planting some flowers, restoring exterior woodwork in prep for a paint job… you get the point. But our sense of urgency is gone. We don’t make plans throughout the week so that we can jump into projects early Saturday morning. I don’t find myself daydreaming about plaster quiet as often as I used to. I guess the honeymoon phase is over, and that passion and first-crush house lust has passed. We’ve grown accustomed to the house the way it is now; we’ve begun to accept it’s many flaws instead of dreaming up ways to fix them. Which is good, I guess. But it definitely takes a toll on our progress. Now that we’re not embarrassed to live amidst construction and chaos, we’re not motivated to make big changes.
Not that I’m not enjoying our new pace. It’s nice to have a life, and more to talk about than the paint in your hair or the latest developments in tile installation. But it’s a little sad to have lost the enthusiasm we once had. I have a week of vacation looming in front of me, and not one new and exciting project lined up that I’m raring to finish. That just feels…. wrong! It’s also pretty boring for all of you reading, since there’s no news to report.
Any pointers from the old-timers out there who have been doing this for years? Is the flame gone for good?
My big tip for those of you looking to start a fixer-upper project… start smaller than 2,200 sq. ft :)
Loyal readers may remember the cat-pee fiasco two summers ago, before our hardwoods had been refinished. When the weather got hot, the floor boards actually became wet and sticky with the years of urine that had soaked into them. (The previous owners had very naughty kitties and, apparently, no noses.)
The posts about cat urine continue to be our most popular. Even more popular than the one where I mention Jake Gyllenhaal naked, though that’s right up there. It seems that there’s just not enough information on the web about how to cure this pretty common problem. I did my fair share of research back in the day, and didn’t find too much either. Mostly because there’s no easy answer… cat pee is terrible, house-invading stuff. The scent of it lingers like nothing else. I still smell it in our upstairs hallway, where a rainbow striped rug and decaying carpet pad didn’t do much to keep the cat urine out of those hardwoods. We painted the hallway floor to seal in the smell, but it didn’t work well enough. And I smell it in our downstairs bathroom, which once held the PO’s litterbox and will one day be gutted entirely, since that’s the only way I can see that smell EVER going away.
I get a lot of commentors begging for help with this problem. I’ve had two in the last week – probably because the summer heat is making the smell stronger. My best solutions were the baking soda sprinkled liberally over the area (it soaked up a lot of pee and made the house smell much better) and the total floor refinishing (sanding, staining, sealing with poly). Everything else, including some expensive specialty cleaning products, was pretty much a waste of time. I do hear vinegar works, but I didn’t try that so I can’t vouch for it.
Our last two commentors have had urine of the HUMAN variety on the steps (great kegger? nah, young kids!) and they’re looking for help. Here’s what they have to say:
patty had this to say on 06.13.07:
i need to know what is the best thing to get human urine out of wood floors and it is the floor of the house not any overlay wood floor. I afriad to carpet it and the smell still comes thru. It is getting hot and i don’t know how old the smell is. I heard alot about the vinegar please let me know if this works or just a quick fix Thank Patty
Sarah had this to say on 06.18.07:
Our son urinated on our steps trying to make it to the bathroom. I thought I cleaned it good until the hot weather came, and it stinks horrible. We use those stairs often, and I’m wondering what you think the best thing might work since it was on the stairs. Does peroxide damage your hard wood floors? Do I need to let it sit for a short time or at least 15 min?
Is there anyone out there who can help them with these questions? I don’t want to leave them with the scent o’ pee any longer than necessary!

Last year, I bought a peony bush with 2 scrawny little blooms on it. This year, it grew exponentially. At last count, it had about 15 big flowers with other small blooms working themselves out. I know they’ll all start flopping over soon from the weight of such large flowers, but right now I’m just enjoying this huge splash of color every time I come up the front walk.
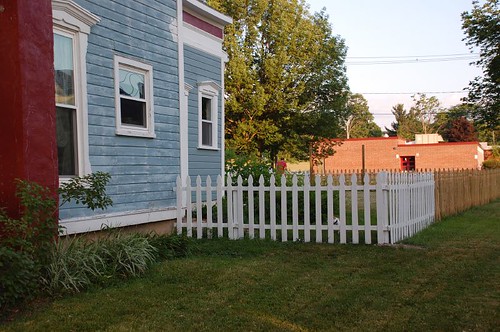
Nearly dark, hurrying to finish putting pretty little fence caps on the gate and corner posts.
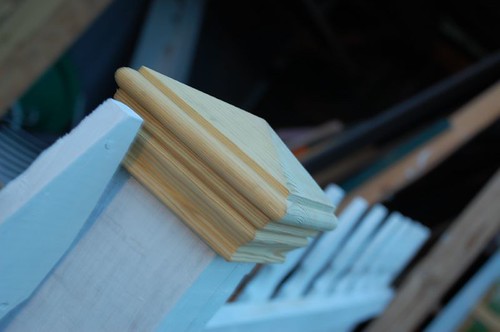
Yesterday I got 4 more panels done, and have the sunburn to prove it. 9 to go……….
|

