I fell off the radar last week, and for that I apologize. I have a good excuse – I’ve been spending all my spare time sanding drywall and painting our two spare bedrooms, which up until a few weeks ago were not at all conducive to sleeping or any other type of human habitation.
I wrote about the first bedroom here. It got a partial facelift, needing only a new ceiling and some patching at the top of the walls. Only. I say that like it was a small job. Ha! It’s looking good though.
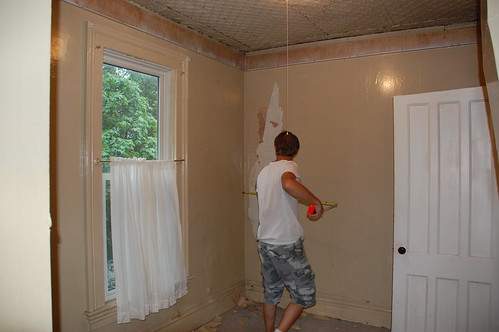
As soon as we finished that, we moved on to the second spare bedroom. It’s a little smaller than the first but it needed much more work. There was nothing about this room that was working for me. It had a dirty old berber rug with no carpet pad, and it was painted super-shiny tan (what’s with the high-gloss in a bedroom?! Yuck.) from baseboard to drop-ceiling. (We took the drop-ceilings out when we had a dumpster a few months back – hence the top-o-room pink wallpaper peeking out.) Best of all, the paint was over about a dozen layers of wallpaper, all of which were peeling.

The ceiling looks kind of cool in these pictures, but when you see it up close you realize that the tin is pieced together in random ways, totally mis-matched and probably thrown up there to hide something. It’s not an original tin ceiling installation, though the tin might be original to the house. What lurks beneath? We don’t know, because there is no way in hell we were going to take them down and find out.
The house has blown-in insulation in the attic. The attic does not have a floor, so that insulation is resting on top of this ceiling. See the problem?
I’d love to say we salvaged the tin, but we didn’t. We argued and debated about it for a few months and decided that the potential disasterous mess was just not worth it. The tin is rusted through in many parts, and we have already salvaged a good deal of it from other spots throughout the house. We have a pile of pretty stuff out in our shed just waiting to be reinvented into something cool. So that tin got left behind for some future DIY’er to discover decades from now.
We explored our options (see the wallpaper missing in places?) and decided that the best way to fix this room was to frame up a new ceiling and go over the walls with 3/8″ sheetrock. Gutting it wasn’t really necessary, but fixing what’s there wasn’t an option either. There are about 12 layers of wallpaper on it, with paint in between each layer. I swear! And the original walls must never have been painted because trying to remove the last layer of wallpaper requires scratching right into the plaster. No good.
This is the only room we’ll have to use this tactic for. I was skeptical, but now that we’re almost done I am glad we went that route. It looks great, and my big fear – removing the baseboards – turned out to be easier than expected.
Stay tuned for “after” photos!


Comments, Thoughts, and Feedback
As always, can’t wait to see the “afters!”
I’ll have to get over there when I’m home this weekend to see how everything looks in person!
“I fell off the radar last week, and for that I apologize. I have a good excuse – I’ve been spending all my spare time sanding drywall and painting our two spare bedrooms”
I fell off the radar with no excuse. I suck.
You all should see this bedroom now that it’s finished. The place is looking grrrreat! Nice job!
We love to hear from you, dear readers.